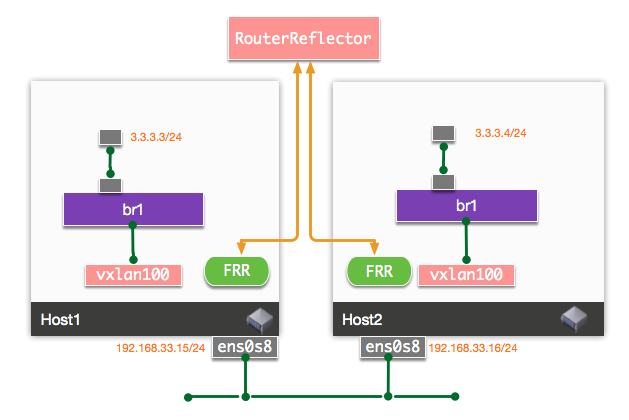
sysctl -w net.ipv4.ip_forward=1 ip netns add ns1 ip link add veth1 type veth peer name eth0 netns ns1 ip netns exec ns1 ip linkset eth0 up ip netns exec ns1 ip linkset lo up ip netns exec ns1 ip addr add 3.3.3.3/24 dev eth0 ip linkset up dev veth1 ip link add br1 type bridge ip linkset br1 up ip linkset veth1 master br1 ip link add vxlan100 type vxlan id 100 dstport 4789 local 192.168.33.15 nolearning ip linkset vxlan100 master br1 ip linkset up vxlan100
在Host2上同样配置:
1
2
3
4
5
6
7
8
9
10
11
12
13
sysctl -w net.ipv4.ip_forward=1 ip netns add ns1 ip link add veth1 type veth peer name eth0 netns ns1 ip netns exec ns1 ip linkset eth0 up ip netns exec ns1 ip linkset lo up ip netns exec ns1 ip addr add 3.3.3.4/24 dev eth0 ip linkset up dev veth1 ip link add br1 type bridge ip linkset br1 up ip linkset veth1 master br1 ip link add vxlan100 type vxlan id 100 dstport 4789 local 192.168.33.16 nolearning ip linkset vxlan100 master br1 ip linkset up vxlan100
root@ubuntu-focal:/home/vagrant# ip netns exec ns1 ip link 1: lo: <LOOPBACK,UP,LOWER_UP> mtu 65536 qdisc noqueue state UNKNOWN mode DEFAULT group default qlen 1000 link/loopback 00:00:00:00:00:00 brd 00:00:00:00:00:00 2: eth0@if4: <BROADCAST,MULTICAST,UP,LOWER_UP> mtu 1500 qdisc noqueue state UP mode DEFAULT group default qlen 1000 link/ether 7a:bb:b4:6a:55:02 brd ff:ff:ff:ff:ff:ff link-netnsid 0
1 2 3 4 5
root@ubuntu-bionic:/home/vagrant# ip netns exec ns1 ip link 1: lo: <LOOPBACK,UP,LOWER_UP> mtu 65536 qdisc noqueue state UNKNOWN mode DEFAULT group default qlen 1000 link/loopback 00:00:00:00:00:00 brd 00:00:00:00:00:00 2: eth0@if4: <BROADCAST,MULTICAST,UP,LOWER_UP> mtu 1500 qdisc noqueue state UP mode DEFAULT group default qlen 1000 link/ether e2:38:ad:ed:8f:9e brd ff:ff:ff:ff:ff:ff link-netnsid 0
root@ubuntu-focal:/home/vagrant/workspace# ip netns exec ns1 ping -c2 3.3.3.4 PING 3.3.3.4 (3.3.3.4) 56(84) bytes of data. 64 bytes from 3.3.3.4: icmp_seq=1 ttl=64 time=0.677 ms 64 bytes from 3.3.3.4: icmp_seq=2 ttl=64 time=0.731 ms
--- 3.3.3.4 ping statistics --- 2 packets transmitted, 2 received, 0% packet loss, time 1007ms rtt min/avg/max/mdev = 0.677/0.704/0.731/0.027 ms
此时, 我们在RR中通过vtysh查看BGP信息:
1 2 3 4 5 6 7 8 9 10 11 12 13 14 15 16
centos3# show bgp summary
L2VPN EVPN Summary: BGP router identifier 192.168.33.12, local AS number 65000 vrf-id 0 BGP table version 0 RIB entries 3, using 552 bytes of memory Peers 2, using 41 KiB of memory Peer groups 1, using 64 bytes of memory
centos3# show bgp evpn route BGP table version is 10, local router ID is 192.168.33.12 Status codes: s suppressed, d damped, h history, * valid, > best, i - internal Origin codes: i - IGP, e - EGP, ? - incomplete EVPN type-2 prefix: [2]:[EthTag]:[MAClen]:[MAC]:[IPlen]:[IP] EVPN type-3 prefix: [3]:[EthTag]:[IPlen]:[OrigIP] EVPN type-4 prefix: [4]:[ESI]:[IPlen]:[OrigIP] EVPN type-5 prefix: [5]:[EthTag]:[IPlen]:[IP]
Network Next Hop Metric LocPrf Weight Path Extended Community Route Distinguisher: 192.168.33.15:2 *>i[2]:[0]:[48]:[7a:bb:b4:6a:55:02] 192.168.33.15 100 0 i RT:65000:100 ET:8 *>i[3]:[0]:[32]:[192.168.33.15] 192.168.33.15 100 0 i RT:65000:100 ET:8 Route Distinguisher: 192.168.33.16:2 *>i[2]:[0]:[48]:[e2:38:ad:ed:8f:9e] 192.168.33.16 100 0 i RT:65000:100 ET:8 *>i[3]:[0]:[32]:[192.168.33.16] 192.168.33.16 100 0 i RT:65000:100 ET:8
Displayed 4 prefixes (4 paths)
可以看到各接收到来自Host1和Host2的两条路由信息,分别是Type 2和Type 3。
在Host1上通过vtysh查看vxlan接口:
1 2 3 4 5 6 7 8 9 10 11 12 13 14
ubuntu-focal# show interface vxlan100 Interface vxlan100 is up, line protocol is up Link ups: 0 last: (never) Link downs: 0 last: (never) vrf: default index 6 metric 0 mtu 1500 speed 0 flags: <UP,BROADCAST,RUNNING,MULTICAST> Type: Ethernet HWaddr: ae:46:52:bd:92:2e inet6 fe80::ac46:52ff:febd:922e/64 Interface Type Vxlan VxLAN Id 100 VTEP IP: 192.168.33.15 Access VLAN Id 1
Master interface: br1
可以看到VTEP信息,VNI为100,所属的bridge为br1
查看VNI:100下的本地MAC地址:
1 2 3 4 5 6
ubuntu-focal# show evpn mac vni 100
Number of MACs (local and remote) known for this VNI: 3
MAC               Type   Intf/Remote VTEP      VLAN  Seq #'s
7a:bb:b4:6a:55:02 local  veth1                       0/0
e2:38:ad:ed:8f:9e remote 192.168.33.16               0/0
06:a7:49:0e:8b:48 local  br1                   1     0/0
ubuntu-focal# show bgp evpn route BGP table version is 6, local router ID is 192.168.33.15 Status codes: s suppressed, d damped, h history, * valid, > best, i - internal Origin codes: i - IGP, e - EGP, ? - incomplete EVPN type-2 prefix: [2]:[EthTag]:[MAClen]:[MAC]:[IPlen]:[IP] EVPN type-3 prefix: [3]:[EthTag]:[IPlen]:[OrigIP] EVPN type-4 prefix: [4]:[ESI]:[IPlen]:[OrigIP] EVPN type-5 prefix: [5]:[EthTag]:[IPlen]:[IP]
Network Next Hop Metric LocPrf Weight Path Extended Community Route Distinguisher: 192.168.33.15:2 *> [2]:[0]:[48]:[7a:bb:b4:6a:55:02] 192.168.33.15 32768 i ET:8 RT:65000:100 *> [3]:[0]:[32]:[192.168.33.15] 192.168.33.15 32768 i ET:8 RT:65000:100 Route Distinguisher: 192.168.33.16:2 *>i[2]:[0]:[48]:[e2:38:ad:ed:8f:9e] 192.168.33.16 0 100 0 i RT:65000:100 ET:8 *>i[3]:[0]:[32]:[192.168.33.16] 192.168.33.16 0 100 0 i RT:65000:100 ET:8