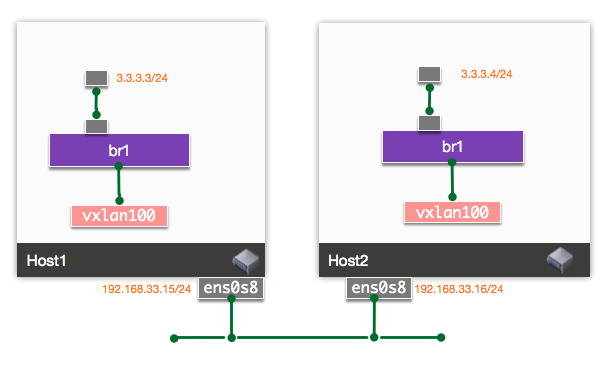
sysctl -w net.ipv4.ip_forward=1 ip netns add ns1 ip link add veth1 type veth peer name eth0 netns ns1 ip netns exec ns1 ip linkset eth0 up ip netns exec ns1 ip linkset lo up ip netns exec ns1 ip addr add 3.3.3.3/24 dev eth0 ip linkset up dev veth1 ip link add br1 type bridge ip linkset br1 up ip linkset veth1 master br1 ip link add vxlan100 type vxlan id 100 dstport 4789 local 192.168.33.15 nolearning ip linkset vxlan100 master br1 ip linkset up vxlan100
sysctl -w net.ipv4.ip_forward=1 ip netns add ns1 ip link add veth1 type veth peer name eth0 netns ns1 ip netns exec ns1 ip linkset eth0 up ip netns exec ns1 ip linkset lo up ip netns exec ns1 ip addr add 3.3.3.4/24 dev eth0 ip linkset up dev veth1 ip link add br1 type bridge ip linkset br1 up ip linkset veth1 master br1 ip link add vxlan100 type vxlan id 100 dstport 4789 local 192.168.33.16 nolearning ip linkset vxlan100 master br1 ip linkset up vxlan100
在Host1的ns1中访问Host2中的3.3.3.4, 此时无法连通:
1
2
3
4
5
6
7
8
root@ubuntu-focal:/home/vagrant/workspace# ip netns exec ns1 ping -c2 3.3.3.4 PING 3.3.3.4 (3.3.3.4) 56(84) bytes of data. From 3.3.3.3 icmp_seq=1 Destination Host Unreachable From 3.3.3.3 icmp_seq=2 Destination Host Unreachable
root@ubuntu-focal:/home/vagrant/workspace# ip netns exec ns1 ip link 1: lo: <LOOPBACK,UP,LOWER_UP> mtu 65536 qdisc noqueue state UNKNOWN mode DEFAULT group default qlen 1000 link/loopback 00:00:00:00:00:00 brd 00:00:00:00:00:00 2: eth0@if4: <BROADCAST,MULTICAST,UP,LOWER_UP> mtu 1500 qdisc noqueue state UP mode DEFAULT group default qlen 1000 link/ether 26:c1:ad:8d:00:73 brd ff:ff:ff:ff:ff:ff link-netnsid 0
1
2
3
4
5
root@ubuntu-bionic:/home/vagrant/workspace# ip netns exec ns1 ip link 1: lo: <LOOPBACK,UP,LOWER_UP> mtu 65536 qdisc noqueue state UNKNOWN mode DEFAULT group default qlen 1000 link/loopback 00:00:00:00:00:00 brd 00:00:00:00:00:00 2: eth0@if4: <BROADCAST,MULTICAST,UP,LOWER_UP> mtu 1500 qdisc noqueue state UP mode DEFAULT group default qlen 1000 link/ether e2:ca:8e:f0:7d:79 brd ff:ff:ff:ff:ff:ff link-netnsid 0
然后在Host1上手动增加VXLAN FDB表项:
1 2
bridge fdb append 00:00:00:00:00:00 dev vxlan100 dst 192.168.33.16 bridge fdb append e2:ca:8e:f0:7d:79 dev vxlan100 dst 192.168.33.16
ip link del vxlan100 ip link add vxlan100 type vxlan id 100 dstport 4789 local 192.168.33.15 nolearning proxy ip linkset vxlan100 master br1 ip linkset up vxlan100 bridge fdb append 00:00:00:00:00:00 dev vxlan100 dst 192.168.33.16 bridge fdb append e2:ca:8e:f0:7d:79 dev vxlan100 dst 192.168.33.16
接着添加3.3.3.4的ARP表项并查看:
1 2 3
root@ubuntu-focal:/home/vagrant/workspace# ip neighbor add 3.3.3.4 lladdr e2:ca:8e:f0:7d:79 dev vxlan100 root@ubuntu-focal:/home/vagrant/workspace# ip neighbor show dev vxlan100 3.3.3.4 lladdr e2:ca:8e:f0:7d:79 PERMANENT
同样在Host2上执行命令, 重新创建VXLAN接口、开启ARP代答并重新添加FDB表项:
1 2 3 4 5 6
ip link del vxlan100 ip link add vxlan100 type vxlan id 100 dstport 4789 local 192.168.33.16 nolearning proxy ip linkset vxlan100 master br1 ip linkset up vxlan100 bridge fdb append 00:00:00:00:00:00 dev vxlan100 dst 192.168.33.15 bridge fdb append 26:c1:ad:8d:00:73 dev vxlan100 dst 192.168.33.15
也添加3.3.3.3的ARP表项:
1 2 3
root@ubuntu-bionic:/home/vagrant/workspace# ip neighbor add 3.3.3.3 lladdr 26:c1:ad:8d:00:73 dev vxlan100 root@ubuntu-bionic:/home/vagrant/workspace# ip neighbor show dev vxlan100 3.3.3.3 lladdr 26:c1:ad:8d:00:73 PERMANENT
此时再次从Host1测试ping, 访问成功:
1 2 3 4 5 6 7 8 9
root@ubuntu-focal:/home/vagrant/workspace# ip netns exec ns1 ip neigh flush all root@ubuntu-focal:/home/vagrant/workspace# ip netns exec ns1 ping -c2 3.3.3.4 PING 3.3.3.4 (3.3.3.4) 56(84) bytes of data. 64 bytes from 3.3.3.4: icmp_seq=1 ttl=64 time=2.52 ms 64 bytes from 3.3.3.4: icmp_seq=2 ttl=64 time=1.01 ms
--- 3.3.3.4 ping statistics --- 2 packets transmitted, 2 received, 0% packet loss, time 1002ms rtt min/avg/max/mdev = 1.012/1.765/2.519/0.753 ms
ip link del vxlan100 ip link add vxlan100 type vxlan id 100 dstport 4789 local 192.168.33.15 nolearning proxy l2miss l3miss ip linkset vxlan100 master br1 ip linkset up vxlan100
接着使用ip moniotr命令去监听消息:
1
ip monitor all dev vxlan100
再次从Host1上去测试ping, 访问不通:
1 2 3 4 5 6 7 8 9
root@ubuntu-focal:/home/vagrant/workspace# ip netns exec ns1 ip neigh flush all root@ubuntu-focal:/home/vagrant/workspace# ip netns exec ns1 ping -c2 3.3.3.4 PING 3.3.3.4 (3.3.3.4) 56(84) bytes of data. From 3.3.3.3 icmp_seq=1 Destination Host Unreachable From 3.3.3.3 icmp_seq=2 Destination Host Unreachable
[NEIGH]miss 3.3.3.4 STALE [NEIGH]miss 3.3.3.4 STALE [NEIGH]miss 3.3.3.4 STALE
我们手动添加上相应ARP表项:
1
2
3
root@ubuntu-focal:/home/vagrant/workspace# ip neighbor replace 3.3.3.4 lladdr e2:ca:8e:f0:7d:79 dev vxlan100 nud reachable
root@ubuntu-focal:/home/vagrant/workspace# ip neighbor show dev vxlan100
3.3.3.4 lladdr e2:ca:8e:f0:7d:79 REACHABLE