LSM: Linux Security Modules是内核中对象访问控制机制。最早的基于访问主体(subject)的身份或者所属组(User,Group,Other)的访问控制机制被称为DAC: Discretionary Access Control, 在许多安全性要求较高的场景下不能适用。于是Linux内核中实现了MAC: Mandatory Access Control机制,来表达访问主体(Subject)是否有权限对访问客体(Object)进行相应操作(Operation), 这个实现就是LSM框架。
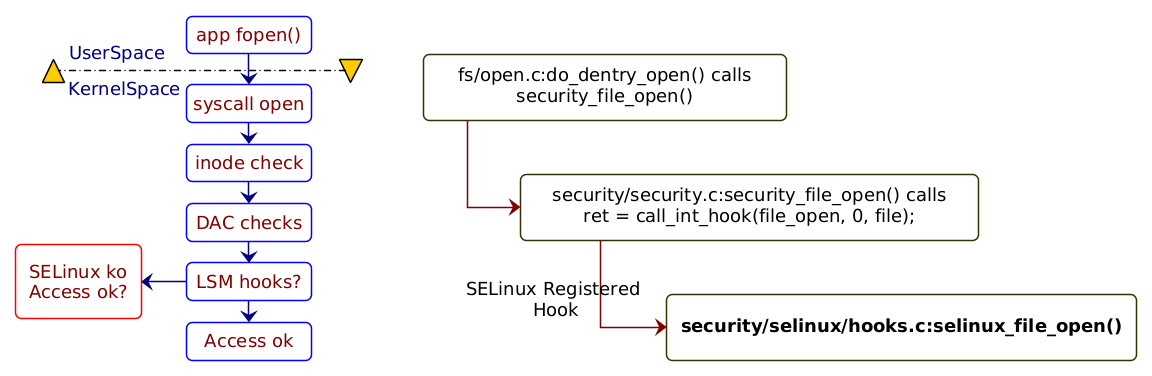
在具体实现上,内核会在相应对象访问前进行相应操作的检测,以系统调用为例来看, 如图:
来自链接
系统调用的实现首先会进行传统的DAC机制检查,通过之后再进行LSM机制检测。
LSM在内核中实现了通用的挂载点(hook)框架, 具体的安全检测逻辑是由独立的安全模块来实现。尽管LSM命名中含有Module,但实际上安全模块的实现并不是正常可动态加载卸载的内核模块,而是必须和内核编译一起编译成二进制。比如,SELinux, AppArmor都是这种形态。
LSM中实现了大量的内核对象被访问前的挂载点,对于我们实现安全功能非常有意义。但我们又没有条件去和内核一起编译,因而需要一种能在内核模块中使用LSM框架的机制。
CentOS7 CentOS7系列使用的3.10版本内核中,LSM实现是将所有安全检测回调函数组织为struct security_operations结构体:
1
2
3
4
5
6
7
8
9
10
struct security_operations { char name[SECURITY_NAME_MAX + 1 ]; int (*ptrace_access_check) (struct task_struct *child, unsigned int mode); int (*ptrace_traceme) (struct task_struct *parent); int (*capget) (struct task_struct *target, kernel_cap_t *effective, kernel_cap_t *inheritable, kernel_cap_t *permitted); ...... }
基于LSM的安全模块会创建自己的security_operations结构,然后调用register_security使模块生效。比如,SELinux的结构为:
1
2
3
4
5
6
7
8
9
10
11
12
static struct security_operations selinux_ops = .name = "selinux" , .ptrace_access_check = selinux_ptrace_access_check, .ptrace_traceme = selinux_ptrace_traceme, .capget = selinux_capget, .capset = selinux_capset, .capable = selinux_capable, .quotactl = selinux_quotactl, .quota_on = selinux_quota_on, ...... }
1
2
3
4
5
6
7
8
9
10
11
12
13
14
15
int __init register_security (struct security_operations *ops) { if (verify(ops)) { printk(KERN_DEBUG "%s could not verify " "security_operations structure.\n" , __func__); return -EINVAL; } if (security_ops != &default_security_ops) return -EAGAIN; security_ops = ops; return 0 ; }
从register_recurity源码知道,内核中使用全局指针security_ops指向security_operations结构体:
1
2
3
4
static struct security_operations *security_ops ;static struct security_operations default_security_ops = .name = "default" , };
据此,我们可以动态将该全局指针security_ops指向我们的结构体,或者动态修改其中的回调函数指针,即可调用动态加载的内核模块中的回调函数。
简单的demo代码如下:
1 2 3 4 5 6 7 8 9 10 11 12 13 14 15 16 17 18 19 20 21 22 23 24 25 26 27 28 29 30 31 32 33 34 35 36 37 38 39 40 41 42 43 44 45 46 47 48 49 50 51 52 53 54 55 56 57 58 59 60 61 62 63 64 65 66 67 68 69 70 71 72 #define pr_fmt(fmt) "[%s]: " fmt, KBUILD_MODNAME #include <linux/version.h> #include <linux/init.h> #include <linux/module.h> #include <linux/kernel.h> #include <linux/kallsyms.h> #include <linux/security.h> #include <linux/stop_machine.h> static struct security_operations **ops_symbol ;static struct security_operations *ops_addr ;static struct security_operations bak_ops ;static int my_file_open (struct file *file, const struct cred *cred) { pr_info("file open: %s\n" , file->f_path.dentry->d_iname); return 0 ; } static int hook_lsm (void *arg) { ops_addr->file_open = my_file_open; pr_info("hook file_open: 0x%p->0x%p, 0x%p\n" , bak_ops.file_open, my_file_open, ops_addr->file_open); return 0 ; } static int unhook_lsm (void *arg) { void *now_file_open = (void *) ops_addr->file_open; ops_addr->file_open = bak_ops.file_open; pr_info("restore file_open: 0x%p->0x%p, 0x%p\n" , now_file_open, bak_ops.file_open, ops_addr->file_open); return 0 ; } static int __init lsmhook_init (void ) { pr_info("lsm hook module init\n" ); ops_symbol = (struct security_operations **) kallsyms_lookup_name("security_ops" ); if (ops_symbol == NULL ) { pr_err("symbol security_ops not found\n" ); return -1 ; } ops_addr = *ops_symbol; pr_info("symbol security_ops: 0x%p, security_operations struct address: 0x%p\n" , ops_symbol, ops_addr); pr_info("name: %s\n" , ops_addr->name); pr_info("file_open: 0x%p\n" , ops_addr->file_open); bak_ops.file_open = ops_addr->file_open; pr_info("start hook LSM\n" ); stop_machine(hook_lsm, NULL , NULL ); return 0 ; } static void __exit lsmhook_exit (void ) { stop_machine(unhook_lsm, NULL , NULL ); pr_info("exit\n" ); } module_init(lsmhook_init); module_exit(lsmhook_exit); MODULE_LICENSE("GPL" );
代码里通过动态获取securit_ops指针的符号地址,然后将file_open指针指向了我们所编写的函数。当内核执行打开文件的动作时,会调用函数do_dentry_open, 它会调用security_file_open函数, 源码如下:
1
2
3
4
5
6
7
8
9
10
int security_file_open (struct file *file, const struct cred *cred) { int ret; ret = security_ops->file_open(file, cred); if (ret) return ret; return fsnotify_perm(file, MAY_OPEN); }
这样security_file_open函数就会调用到我们所编写的函数,从而实现我们的逻辑控制。
CentOS8 而CentOS8上所使用的4.18内核实现与3.10上有所不同。
它将所有的回调函数指针统一定义为union结构体:
1
2
3
4
5
6
7
8
9
10
11
union security_list_options { int (*binder_set_context_mgr)(struct task_struct *mgr); int (*binder_transaction)(struct task_struct *from, struct task_struct *to); int (*binder_transfer_binder)(struct task_struct *from, struct task_struct *to); int (*binder_transfer_file)(struct task_struct *from, struct task_struct *to, struct file *file); ...... }
进而将每个回调函数组织成一个链表的元素:
1
2
3
4
5
6
struct security_hook_list { struct hlist_node list ; struct hlist_head *head ; union security_list_options hook ; char *lsm; } __randomize_layout;
所有支持的回调函数都集中在结构体security_hook_heads中:
1
2
3
4
5
6
7
8
9
10
11
12
struct security_hook_heads { struct hlist_head binder_set_context_mgr ; struct hlist_head binder_transaction ; struct hlist_head binder_transfer_binder ; struct hlist_head binder_transfer_file ; struct hlist_head ptrace_access_check ; struct hlist_head ptrace_traceme ; struct hlist_head capget ; struct hlist_head capset ; struct hlist_head capable ; struct hlist_head quotactl ; struct hlist_head quota_on ;
在特定的挂载点注册安全检测逻辑需要调用函数security_add_hooks:
1
2
3
4
5
6
7
8
9
10
11
12
void __init security_add_hooks (struct security_hook_list *hooks, int count, char *lsm) { int i; for (i = 0 ; i < count; i++) { hooks[i].lsm = lsm; hlist_add_tail_rcu(&hooks[i].list , hooks[i].head); } if (lsm_append(lsm, &lsm_names) < 0 ) panic("%s - Cannot get early memory.\n" , __func__); }
它会将回调函数添加到特定挂载点链表的尾部。
同样,结构体security_hook_heads也存在全局变量:
1 struct security_hook_heads security_hook_heads __lsm_ro_after_init ;
基于这种实现,我们可以动态获取全局变量security_hook_heads的符号地址,进而将我们的函数添加到特定挂载点的链表中。
demo代码如下:
1 2 3 4 5 6 7 8 9 10 11 12 13 14 15 16 17 18 19 20 21 22 23 24 25 26 27 28 29 30 31 32 33 34 35 36 37 38 39 40 41 42 43 44 45 46 47 48 49 50 51 52 53 54 55 56 57 58 59 60 61 62 63 64 65 66 67 68 69 70 71 72 73 74 75 76 77 78 79 80 81 82 83 84 85 86 87 #define pr_fmt(fmt) "[%s]: " fmt, KBUILD_MODNAME #include <linux/version.h> #include <linux/init.h> #include <linux/module.h> #include <linux/kernel.h> #include <linux/kallsyms.h> #include <linux/stop_machine.h> #include <linux/security.h> #include <linux/lsm_hooks.h> static int my_file_open (struct file *file) { pr_info("file open: %s\n" , file->f_path.dentry->d_iname); return 0 ; } #define MY_LSM_HOOK_INIT(HEAD, HOOK) \ { .head = &((struct security_hook_heads *)0)->HEAD, .hook = { .HEAD = HOOK } } static struct security_hook_heads *heads_symbol ;struct security_hook_list hooks [] = MY_LSM_HOOK_INIT(file_open, my_file_open), }; static int hook_lsm (void *arg) { int i; for (i = 0 ; i < ARRAY_SIZE(hooks); i++) { hooks[i].lsm = "lsmhook" ; hooks[i].head = (struct hlist_head *) ((unsigned long )hooks[i].head + (unsigned long )heads_symbol); hlist_add_tail_rcu(&hooks[i].list , hooks[i].head); } return 0 ; } static int unhook_lsm (void *arg) { int i; for (i = 0 ; i < ARRAY_SIZE(hooks); i++) { hlist_del_rcu(&hooks[i].list ); } return 0 ; } static int lsm_info_get (void ) { heads_symbol = (struct security_hook_heads *) kallsyms_lookup_name("security_hook_heads" ); if (heads_symbol == NULL ) { pr_err("symbol security_hook_heads not found\n" ); return -1 ; } pr_info("symbol security_hook_heads: 0x%lx\n" , (unsigned long )heads_symbol); return 0 ; } static int __init lsmhook_init (void ) { pr_info("lsm hook module init\n" ); if (lsm_info_get() != 0 ) { pr_err("get LSM information failed\n" ); return -1 ; } pr_info("start hook LSM\n" ); stop_machine(hook_lsm, NULL , NULL ); return 0 ; } static void __exit lsmhook_exit (void ) { stop_machine(unhook_lsm, NULL , NULL ); pr_info("exit\n" ); } module_init(lsmhook_init); module_exit(lsmhook_exit); MODULE_LICENSE("GPL" );
说明 实际上,将我们的逻辑以内核模块动态插入到LSM中,思路是比较简单、比较清晰的。但是移除的逻辑就要比较小心了。如何保证移除我们的模块时,函数已经不会再被使用是需要非常小心处理的。因为是从内核其实部分调用进我们提供的回调函数,因而我们在我们模块中实现引用计数机制无法保证内核其他部分没有在使用我们的函数。处理不当,很容易导致内核崩溃。文中所提供的演示代码并没有涉及这部分,不能应用到生产环境中。
参考