之前的文章<<使用eBPF和BCC调查创建文件的进程 >>介绍了基于BCCeBPF程序。BCC实现了对eBPF的封装,用户态部分提供Python API, 内核态部分使用的eBPF程序还是通过C语言来实现。运行时BCC会把eBPF的C程序编译成字节码、加载到内核执行,最后再通过用户空间的前端程序获取执行状态。BCC的BPF调用中,指定参数debug=4, 我们可以看到BCC的执行过程, 如:
1
2
3
4
5
6
7
from bcc import BPFBPF(text=""" #include <linux/ptrace.h> int kprobe__tty_write(struct pt_regs *ctx, struct file *file, const char __user *buf, size_t count) { return 0; } """ , debug=4 )
eBPF编程的门槛还是比较高的,在当前还是快速发展的情况,API也还不稳定,对程序员的C语言、编译过程和内核等知识都有比较高的要求。BCC把这些都封装起来给用户提供了一个更为简单的使用框架。但本身也存在的一些问题,比如:
每次执行时都需要重新编译
执行程序的机器都需要安装内核头文件
eBPF: extended Berkeley Packet Filter是对BPF(现在称为cBPF: classic BPF)的扩展, 现在尽管还叫做BPF, 但应用场景已经远远超过了它的名称的范畴。它的应用范围的扩大主要得益于这几方面:
内核中BPF字节码虚拟机扩展为一个通用的执行引擎
执行可节码的安全校验
JIT支持,可以直接将字节码指令转成内核可执行的原生指令运行
这样在安全性、可编程性和性能方面的提升都使得eBPF在包过滤以外的其他领域获取巨大的应用空间。
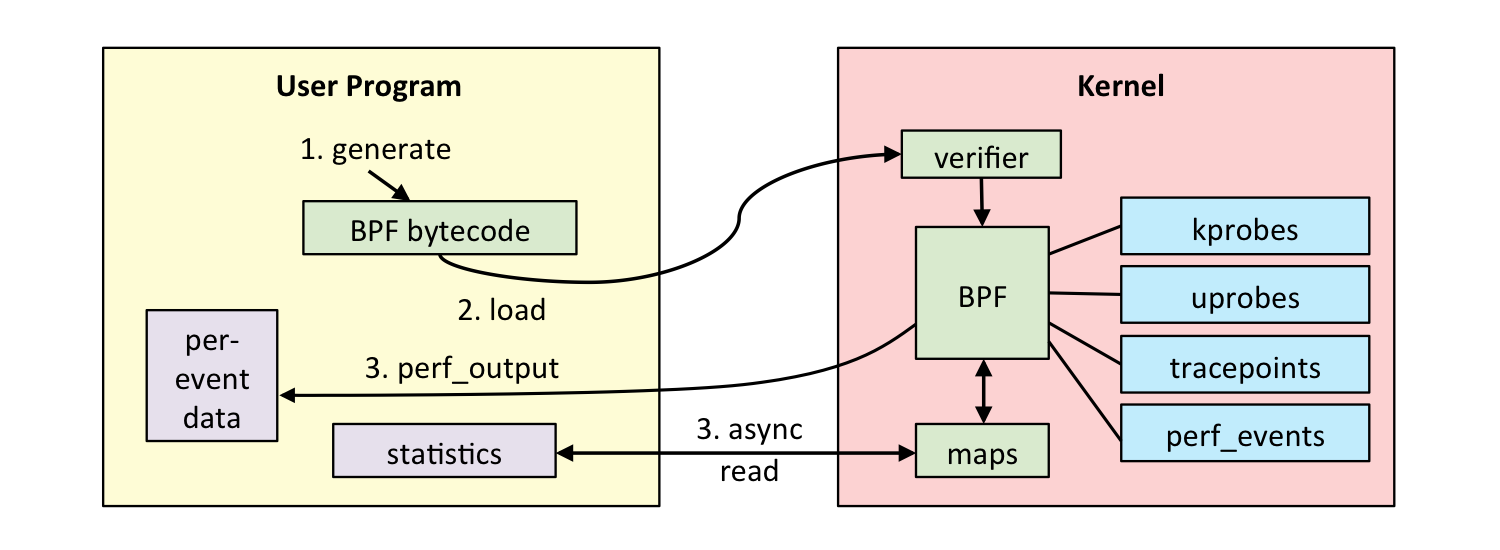
eBPF的整体架构图如下:
图片来自: https://cloudnative.to/blog/bpf-intro/linux_ebpf_internals.png
eBPF程序分为两部分:
内核态部分: 内核中的eBPF字节码程序负责在内核中处理特定事件,并可以将处理的结果通过maps或者perf-event发送到用户空间
用户态部分: 用户态部分主要有两方面作用:
加载eBPF字节码程序到内核中
与内核态eBPF程序之写读写信息
eBPF本身是事件驱动触发的机制,因而需要将特定的内核事件与eBPF字节码程序进行关联。
eBPF程序的开发及运行的一个典型过程如下:
编写eBPF程序,并编译成字节码,目前只能使用CLANG和LLVM编译成eBPF字节码
将eBPF程序加载到内核中,内核会校验字节码避免内核崩溃
将内核事件与eBPF程序进行关联
内核事件发生时,eBPF程序执行,发送信息给用户态程序
用户态程序读取相关信息
我们还是以之前文章中的示例来说明上述过程。上文我们提到我们的系统是CentOS7.8, 尽管CentOS7上的eBPF支持还是比较实验性的,但大多数功能还是能支持的。
由于要使用CLANG和LLVM来编译eBPF程序,而CentOS7上默认yum安装的CLANG和LLVM的版本比较老,不支持eBPF的编译。可以从这个repo中安装, 在/etc/yum.repos.d/下创建文件c7-llvm.repo文件, 内容如下:
1
2
3
4
5
[c7-llvm-toolset-9] name=c7-llvm-toolset-9 baseurl=https://buildlogs.centos.org/c7-llvm-toolset-9.0.x86_64/ gpgcheck=0 enabled=1
然后执行以下命令进行安装并启用:
1
2
yum install llvm-toolset-9.0 source /opt/rh/llvm-toolset-9.0/enable
准备好编译环境之后,我们开始编写eBPF程序, vfs_create.c内容如下:
1 2 3 4 5 6 7 8 9 10 11 12 13 14 15 16 17 18 19 20 21 22 23 24 25 26 27 28 29 30 31 32 33 34 35 36 37 38 39 40 41 42 #include <linux/kconfig.h> #include <linux/fs.h> #include <uapi/linux/ptrace.h> #include <uapi/linux/bpf.h> #include <linux/version.h> #include <linux/sched.h> #define SEC(NAME) __attribute__((section(NAME), used)) static int (*bpf_trace_printk) (const char *fmt, int fmt_size, ...) = (void *) BPF_FUNC_trace_printk; static int (*bpf_probe_read) (void *dst, int size, void *src) = (void *) BPF_FUNC_probe_read; #define PT_REGS_PARM1(x) ((x)->di) #define PT_REGS_PARM2(x) ((x)->si) #define PT_REGS_PARM3(x) ((x)->dx) #define PT_REGS_PARM4(x) ((x)->cx) #define PT_REGS_PARM5(x) ((x)->r8) #define PT_REGS_RET(x) ((x)->sp) #define PT_REGS_FP(x) ((x)->bp) #define PT_REGS_RC(x) ((x)->ax) #define PT_REGS_SP(x) ((x)->sp) #define PT_REGS_IP(x) ((x)->ip) SEC("kprobe/vfs_create" ) int kprobe__vfs_create (struct pt_regs *ctx) { char fmt[] = "FNAME: %s\n" ; struct dentry *dentry =struct dentry *) PT_REGS_PARM2(ctx); struct qstr d_name = bpf_probe_read(&d_name, sizeof (d_name), &dentry->d_name); if (d_name.len == 0 ) return 0 ; bpf_trace_printk(fmt, sizeof (fmt), d_name.name); return 0 ; }; char _license[] SEC("license" ) = "GPL" ;u32 _version SEC ("version" ) = LINUX_VERSION_CODE;
程序逻辑和之前文章中类似,可以看到和写在BCC中的C代码是不同的。例如,这里使用的eBPF程序的参数只有一个struct pt_regs *ctx, 其他的参数需要从ctx中获取到,而BCC中的C代码的函数参数中就已经带有相关参数了。因为BCC会在编译代码前对代码进行处理,可以使用文章开头所说的debug=4来查看这些细节。
然后编写Makefile:
1
2
3
4
5
6
7
8
9
10
11
12
13
14
15
16
17
18
19
20
21
22
23
24
25
26
27
28
29
30
31
32
33
34
35
36
37
38
39
40
41
42
43
44
45
46
47
48
49
50
OBJS = vfs_create.o LLC ?= llc CLANG ?= clang INC_FLAGS = -nostdinc -isystem `$(CLANG) -print-file-name=include ` EXTRA_CFLAGS ?= -O2 -emit-llvm linuxhdrs ?= /usr/src/kernels/`uname -r` LINUXINCLUDE = -I$(linuxhdrs) /include \ -I$(linuxhdrs) /include /uapi \ -I$(linuxhdrs) /include /generated \ -I$(linuxhdrs) /include /generated/uapi \ -I$(linuxhdrs) /arch/x86/include \ -I$(linuxhdrs) /arch/x86/include /uapi \ -I$(linuxhdrs) /arch/x86/include /generated \ -I$(linuxhdrs) /arch/x86/include /generated/uapi prefix ?= /usr/local INSTALLPATH = $(prefix) /lib/bpf install_PROGRAM = install install_DIR = install -dv all: $(OBJS) .PHONY : cleanclean: rm -f $(OBJS) INC_FLAGS = -nostdinc -isystem `$(CLANG) -print-file-name=include ` $(OBJS) : %.o:%.c $(CLANG) $(INC_FLAGS) \ -D__KERNEL__ -D__ASM_SYSREG_H -D__BPF_TRACING__ \ -Wno-unused-value -Wno-pointer-sign \ -Wno-compare-distinct-pointer-types \ -Wno-gnu-variable-sized-type-not-at-end \ -Wno-address-of-packed-member -Wno-tautological-compare \ -Wno-unknown-warning-option \ -I../include $(LINUXINCLUDE) \ $(EXTRA_CFLAGS) -c $< -o -| $(LLC) -march=bpf -filetype=obj -o $@ install: $(OBJS) $(install_DIR) -d $(INSTALLPATH) ; \ $(install_PROGRAM) $^ -t $(INSTALLPATH) uninstall: $(OBJS) rm -rf $(INSTALLPATH)
编译我们编写的eBPF程序,这需要提前安装好相应内核版本的kernel-devel包:
这会在当前目录生成vfs_create.o文件, 使用llvm-objdump查看生成的eBPF程序:
1
2
3
4
5
6
7
8
9
10
11
12
13
14
15
16
17
18
19
20
21
22
23
24
25
26
27
28
29
30
31
32
33
[root@default bpf] ./vfs_create.o: file format ELF64-BPF Disassembly of section kprobe/vfs_create: 0000000000000000 kprobe__vfs_create: 0: b7 02 00 00 73 0a 00 00 r2 = 2675 1: 6b 2a f8 ff 00 00 00 00 *(u16 *)(r10 - 8) = r2 2: 18 02 00 00 46 4e 41 4d 00 00 00 00 45 3a 20 25 r2 = 2675202247981354566 ll 4: 7b 2a f0 ff 00 00 00 00 *(u64 *)(r10 - 16) = r2 5: b7 02 00 00 00 00 00 00 r2 = 0 6: 73 2a fa ff 00 00 00 00 *(u8 *)(r10 - 6) = r2 7: 79 13 68 00 00 00 00 00 r3 = *(u64 *)(r1 + 104) 8: 7b 2a e8 ff 00 00 00 00 *(u64 *)(r10 - 24) = r2 9: 7b 2a e0 ff 00 00 00 00 *(u64 *)(r10 - 32) = r2 10: 07 03 00 00 20 00 00 00 r3 += 32 11: bf a1 00 00 00 00 00 00 r1 = r10 12: 07 01 00 00 e0 ff ff ff r1 += -32 13: b7 02 00 00 10 00 00 00 r2 = 16 14: 85 00 00 00 04 00 00 00 call 4 15: 61 a1 e4 ff 00 00 00 00 r1 = *(u32 *)(r10 - 28) 16: 15 01 05 00 00 00 00 00 if r1 == 0 goto +5 <LBB0_2> 17: 79 a3 e8 ff 00 00 00 00 r3 = *(u64 *)(r10 - 24) 18: bf a1 00 00 00 00 00 00 r1 = r10 19: 07 01 00 00 f0 ff ff ff r1 += -16 20: b7 02 00 00 0b 00 00 00 r2 = 11 21: 85 00 00 00 06 00 00 00 call 6 00000000000000b0 LBB0_2: 22: b7 00 00 00 00 00 00 00 r0 = 0 23: 95 00 00 00 00 00 00 00 exit
至此我们完成了上述典型过程的第一步。接下来看如何加载eBPF程序。
可以直接使用bpftool来加载程序,具体的使用信息可以参考man bpftool-prog。
执行bpftool之前需要加挂载/sys/fs/bpf目录,这是因为内核中的eBPF对象由一个文件描述符引用,当bpftool工具退出时,相应的文件描述符关闭时,eBPF程序也就销毁了,因而内核提供了/sys/fs/bpf机制,保证程序退出后,eBPF程序依然存在,对细节感兴趣可以参考LWN的这篇 。
1 mount -t bpf none /sys/fs/bpf
加载eBPF程序, 使用show命令可以看到我们创建的eBPF程序:
1
2
3
4
5
[root@default bpf] [root@default bpf] 41: kprobe name kprobe__vfs_cre tag f7facf2555238156 gpl loaded_at 2022-03-21T17:06:01+0000 uid 0 xlated 192B jited 153B memlock 4096B
要删除eBPF程序只需要移除bpffs里的文件:
1 rm /sys/fs/bpf/vfs_create
为了更好的说明加载的过程,我们使用C语言调用bpf系统调用实现一个简单的加载器loader.c:
1 2 3 4 5 6 7 8 9 10 11 12 13 14 15 16 17 18 19 20 21 22 23 24 25 26 27 28 29 30 31 32 33 34 35 36 37 38 39 40 41 42 43 44 45 46 47 48 49 50 51 52 53 54 55 56 57 58 59 60 61 62 63 64 65 66 67 68 69 70 71 72 73 #define _GNU_SOURCE #include <unistd.h> #include <string.h> #include <sys/syscall.h> #include <stdlib.h> #include <stdio.h> #include <sys/stat.h> #include <fcntl.h> #include <linux/bpf.h> #include <linux/version.h> #include <errno.h> int main (int argc, char **argv) { int bfd, pfd; unsigned char buf[1024 ] = {}; struct bpf_insn *insn ; union bpf_attr attr = unsigned char log_buf[4096 ] = {}; int ret, n, i; if (argc != 3 ) { printf ("Usage: loader <ebpf file> <pathname>\n" ); exit (-1 ); } bfd = open(argv[1 ], O_RDONLY); if (bfd < 0 ) { printf ("open eBPF program error: %s\n" , strerror(errno)); exit (-1 ); } n = read(bfd, buf, 1024 ); for (i = 0 ; i < n; ++i) { if (i % 8 == 0 ) printf ("\n%03x: " , i); printf ("%02x " , buf[i]); } close(bfd); printf ("\n" ); insn = (struct bpf_insn*)buf; attr.prog_type = BPF_PROG_TYPE_KPROBE; attr.insns = (unsigned long )insn; attr.insn_cnt = n / sizeof (struct bpf_insn); attr.license = (unsigned long ) "GPL" ; attr.log_size = sizeof (log_buf); attr.log_buf = (unsigned long )log_buf; attr.log_level = 1 ; attr.kern_version = LINUX_VERSION_CODE; memcpy (attr.prog_name, "vfs_create" , sizeof ("vfs_create" )); pfd = syscall(SYS_bpf, BPF_PROG_LOAD, &attr, sizeof (attr)); if (pfd < 0 ) { printf ("bpf syscall load error: %s\n" , strerror(errno)); printf ("log_buf = %s\n" , log_buf); exit (-1 ); } bzero(&attr, sizeof (attr)); attr.pathname = (unsigned long )((void *)argv[2 ]); attr.bpf_fd = pfd; if (syscall(SYS_bpf, BPF_OBJ_PIN, &attr, sizeof (attr)) < 0 ) { printf ("bpf syscall pin error: %s\n" , strerror(errno)); exit (-1 ); } printf ("eBPF prog loaded\n" ); }
为了简单没有在代码中处理ELF文件格式,而直接使用eBPF的字节码。我们可以使用dd程序从vfs_create.o这个ELF文件中抽取出字节码。llvm-readelf查看vfs_create.o, 可以看到kprobe/vfs_create段的偏移量是000040,也就是64, 大小是0000c0, 也就是192字节:
1
2
3
4
5
6
7
8
9
10
11
12
13
14
15
16
17
18
19
20
[root@default bpf] There are 10 section headers, starting at offset 0x280: Section Headers: [Nr] Name Type Address Off Size ES Flg Lk Inf Al [ 0] NULL 0000000000000000 000000 000000 00 0 0 0 [ 1] .strtab STRTAB 0000000000000000 000200 00007f 00 0 0 1 [ 2] .text PROGBITS 0000000000000000 000040 000000 00 AX 0 0 4 [ 3] kprobe/vfs_create PROGBITS 0000000000000000 000040 0000c0 00 AX 0 0 8 [ 4] .rodata.str1.1 PROGBITS 0000000000000000 000100 00000b 01 AMS 0 0 1 [ 5] license PROGBITS 0000000000000000 00010b 000004 00 WA 0 0 1 [ 6] version PROGBITS 0000000000000000 000110 000004 00 WA 0 0 4 [ 7] .eh_frame PROGBITS 0000000000000000 000118 000030 00 A 0 0 8 [ 8] .rel.eh_frame REL 0000000000000000 0001f0 000010 10 9 7 8 [ 9] .symtab SYMTAB 0000000000000000 000148 0000a8 18 1 4 8 Key to Flags: W (write), A (alloc), X (execute), M (merge), S (strings), l (large) I (info), L (link order), G (group), T (TLS), E (exclude), x (unknown) O (extra OS processing required) o (OS specific), p (processor specific)
使用dd命令抽取字节码部分:
1
2
3
4
[root@default bpf] 192+0 records in 192+0 records out 192 bytes (192 B) copied, 0.0136997 s, 14.0 kB/s
编译我们编写的loader, 并加载eBPF程序:
1
2
3
4
5
6
7
8
9
10
11
12
13
14
15
16
17
18
19
20
21
22
23
24
25
26
27
[root@default bpf] 000: b7 02 00 00 73 0a 00 00 008: 6b 2a f8 ff 00 00 00 00 010: 18 02 00 00 46 4e 41 4d 018: 00 00 00 00 45 3a 20 25 020: 7b 2a f0 ff 00 00 00 00 028: b7 02 00 00 00 00 00 00 030: 73 2a fa ff 00 00 00 00 038: 79 13 68 00 00 00 00 00 040: 7b 2a e8 ff 00 00 00 00 048: 7b 2a e0 ff 00 00 00 00 050: 07 03 00 00 20 00 00 00 058: bf a1 00 00 00 00 00 00 060: 07 01 00 00 e0 ff ff ff 068: b7 02 00 00 10 00 00 00 070: 85 00 00 00 04 00 00 00 078: 61 a1 e4 ff 00 00 00 00 080: 15 01 05 00 00 00 00 00 088: 79 a3 e8 ff 00 00 00 00 090: bf a1 00 00 00 00 00 00 098: 07 01 00 00 f0 ff ff ff 0a0: b7 02 00 00 0b 00 00 00 0a8: 85 00 00 00 06 00 00 00 0b0: b7 00 00 00 00 00 00 00 0b8: 95 00 00 00 00 00 00 00 eBPF prog loaded
此时使用bpftool查看eBPF程序, 可以看到我们的程序被成功加载:
1
2
3
4
[root@default user] 43: kprobe name vfs_create tag f7facf2555238156 gpl loaded_at 2022-03-21T17:18:36+0000 uid 0 xlated 192B jited 153B memlock 4096B
至此第二步完成。
第三步是要内核事件与加载的eBPF程序进行关联。我们使用的事件源是kprobe。每个kprobe或kretprobe被创建时都会关联一个id, 存储在/sys/kernel/debug/tracing/events/[uk]probe/xxxxxx/id或/sys/kernel/debug/tracing/events/[uk]retprobe/xxxxxx/id中。具体怎样使用sysfs创建kprobe可以参考内核文档 。我们需要使用这个id打开一个perf_event并启用它,关联到指定的eBPF程序做为我们的事件处理程序。
首先创建vfs_create的kprobe, 并查看相应probe的id:
1
2
3
[root@default user] [root@default user] 1462
编写关联逻辑的代码attacher.c:
1 2 3 4 5 6 7 8 9 10 11 12 13 14 15 16 17 18 19 20 21 22 23 24 25 26 27 28 29 30 31 32 33 34 35 36 37 38 39 40 41 42 43 44 45 46 47 48 49 50 51 52 53 54 55 56 57 58 59 60 61 62 63 64 65 66 67 68 69 #define _GNU_SOURCE #include <unistd.h> #include <string.h> #include <sys/syscall.h> #include <stdlib.h> #include <stdio.h> #include <sys/stat.h> #include <fcntl.h> #include <linux/bpf.h> #include <linux/perf_event.h> #include <linux/hw_breakpoint.h> #include <errno.h> int main (int argc, char **argv) { int ret, efd, pfd; struct perf_event_attr pattr = long event_id, ebpf_id; union bpf_attr attr ; if (argc != 3 ) { printf ("Usage: attacher <event id> <eBPF id>\n" ); exit (-1 ); } event_id = strtol(argv[1 ], NULL , 10 ); ebpf_id = strtol(argv[2 ], NULL , 10 ); printf ("Event: %ld, eBPF: %ld\n" , event_id, ebpf_id); bzero(&attr, sizeof (attr)); attr.prog_id = ebpf_id; pfd = syscall(SYS_bpf, BPF_PROG_GET_FD_BY_ID, &attr, sizeof (attr)); if (pfd < 0 ) { printf ("bpf error: %s\n" , strerror(errno)); exit (-1 ); } pattr.type = PERF_TYPE_TRACEPOINT; pattr.sample_type = PERF_SAMPLE_RAW; pattr.sample_period = 1 ; pattr.wakeup_events = 1 ; pattr.config = event_id; pattr.size = sizeof (pattr); efd = syscall(SYS_perf_event_open, &pattr, -1 , 0 , -1 , 0 ); if (efd < 0 ) { printf ("perf_event_open error: %s\n" , strerror(errno)); exit (-1 ); } ret = ioctl(efd, PERF_EVENT_IOC_SET_BPF, pfd); if (ret < 0 ) { printf ("PERF_EVENT_IOC_SET_BPF error: %s\n" , strerror(errno)); exit (-1 ); } ret = ioctl(efd, PERF_EVENT_IOC_ENABLE, 0 ); if (ret < 0 ) { printf ("PERF_EVENT_IOC_ENABLE error: %s\n" , strerror(errno)); exit (-1 ); } printf ("attach success\n" ); while (1 ) { sleep(1 ); } }
1
2
3
4
[root@default user] [root@default user] Event: 1462, eBPF: 43 attach success
bpf_trace_printk会将信息写入到文件/sys/kernel/debug/tracing/trace_pipe。我们打开一个终端读取它的内容, 在另一个终端上,在/tmp目录下创建文件:
可以看到trace_pipe内容中看到相应的文件记录:
1
2
[root@default tmp] touch-5892 [000] d... 116854.904439: : FNAME: dummy.xxx
eBPF现在发展很快,不同的内核版本上,这里所用的代码可能需要有所调整。想要具体的了解eBPF编程相关的内容还是要熟悉内核中eBPF相关的代码,而且在不同的内核版本上,文件目录可能都会有所不同。
参考链接: